Monday, November 19, 2012

Autocad: changing Layout tab color


If you're like me an you often work in files with lots of layout tabs, it can often be a bit of a nightmare deciphering which layout tab is active. 

The 'active' layout tab changes to a very slightly different colour to the rest of the layout tabs when selected. However the contrast between the colour of the 'active' and 'non active' layout tabs is minimal making it very hard to know which tab you are on. 

This is not the end of the world because you can usually tell by looking at the drawing which tab is active. But if like me you like things 'just so' we discovered this simple tip for making it clearer which layout tab you have selected. 

We have found that by changing the colour of the cross hair (in options dialog / display tab) that the text of the active paperspace tab also changes colour. In the above image we have changed the cross hair colour to red and as you can see the text of the layout tab has also changed colour. 
Autocad drawing won't open


Do you ever find a drawing wont open for no apparent reason! ? You would assume that a colleague may have it open on his / her machine. So you ask them to close this file and you still cant access the drawing! There is a solution! AutoCAD produces a DWL file which stands for Drawing lock. This prevents multiple user making changes to a particular file. Anyway back to sorting this annoying problem out. you need to locate the DWL file which will reside in the same folder as the drawing file then delete it

AutoCAD Tip

If you are a user of annotation scaling then this could relieve you of the annoying ghost annotation appearing when you have several scales in a drawing. To turn this off just type: SELECTIONANNODISPLAY  = 0

Wednesday, November 14, 2012

AutoCAD 2013 tips - Ellipse


 Simply draw a rectangle of any size, enter PEDIT, Select the rectangle and select spline. Hit return and you will notice you now have an ellipse. You will notice the push and pull handles are at the corners. 

Tuesday, November 6, 2012

Quick Shutdown for Windows 8


Quick Shutdown for Windows 8
My variation is to create a Metro tile which shuts down the machine, the benefit is you can tab to your tile, then press enter.
Start on the Windows 8 desktop, or in a new folder - anywhere except in the Start Menu folder!
Right-click, New, Shortcut.  Paste the instruction:
C:\windows\system32\shutdown /s /t 20 (remember the space between t and 20)
Name the shortcut after yourself, e.g. Guy's Shutdown, that way you will recognise it easily!
Use Windows Explorer to navigate to the crucial folder:
C:\ProgramData\Microsoft\Windows\Start Menu\Programs
Paste your shortcut.  (In passing you can see it's not possible to create a new shortcut here)
It's reassuring to see your shortcut amongst the other Apps.
Return to the Metro UI start screen - Windows Key is the quickest way.
Tab to your shutdown tile, press enter.

How To Delete Windows.old in Windows 8


How To Delete Windows.old in Windows 8


Windows 8 trial versions are out and include Developer Preview and Consumer Preview both with letting a user upgrade to Windows 8 from previous versions.
All the files and programs are retained while upgrading from Windows 7 to Windows 8 but all your applications are put in another folder when upgrading from Consumer or Developer Preview to the latest version.
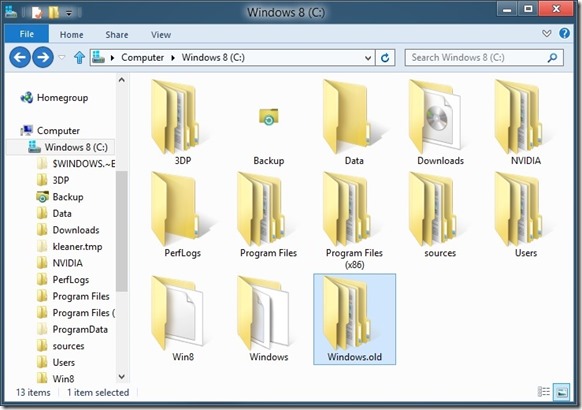
Windows.old folder - Windows 8
In case of an upgrade from either of the two Previews, you will find Windows.old folder if you chose not to format the partition when upgrading. This folder will be located in the root of installation drive for Windows. You don’t need this folder because all the files and folders belong to previous operating system. You can delete the folder and free disk space consequently.
Since Windows.old contains files from your previous system, it is recommended that you open this folder up to backup any data that you might not want to lose.
To entirely remove the Windows.old folder in Windows 8, follow the procedure:
Space
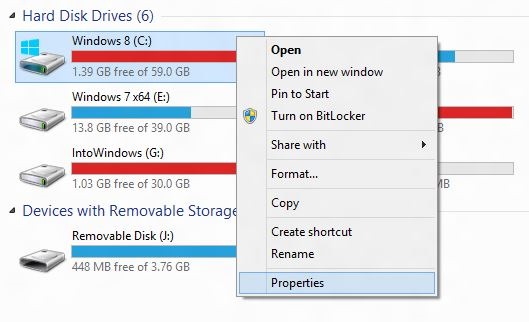
Step 1: Access the Windows drive by right-clicking on it and go to Properties.
Step 1
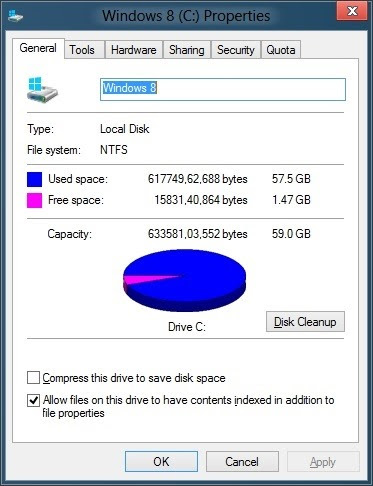
Step 2: Click on the General tab and look for Disk Cleanup option. Click on it.
Step 2

Step 3: In the next box that appears, click Clean up system files option and option and Yes UAC prompt that follows.
Step 3

Step 4: The files to be deleted will be listed. Check Previous Windows installation(s) box from the list and click Ok. Hit Apply to remove the folder completely.

Friday, November 2, 2012

unhide hidden files


How to unhide hidden files on an external drive.

1. click start>>run>>type in "cmd"
2. type the location of your flash drive.. e.g. "d:", "e:", "f:", etc..
3. type "dir /ah"
*you will now see the files/folders with hidden attributes
4. type "attrib [name of file/folder] -r -a -s -h"
*if you're going to unhide files, you should type the whole name plus the extension (format).. example "attrib party.jpg -r -a -s -h"
**if you have folders with 6 characters and above, type the first 6 characters then "~1".. example for folder named "birthday"
"attrib birthd~1 -r -a -s -h"
5. you should repeatedly type dir /ah after unhiding some files/folders so you'll know if they're now working or not..
6. now check you flash drive.. it should be there..