Monday, November 19, 2012

Autocad: changing Layout tab color


If you're like me an you often work in files with lots of layout tabs, it can often be a bit of a nightmare deciphering which layout tab is active. 

The 'active' layout tab changes to a very slightly different colour to the rest of the layout tabs when selected. However the contrast between the colour of the 'active' and 'non active' layout tabs is minimal making it very hard to know which tab you are on. 

This is not the end of the world because you can usually tell by looking at the drawing which tab is active. But if like me you like things 'just so' we discovered this simple tip for making it clearer which layout tab you have selected. 

We have found that by changing the colour of the cross hair (in options dialog / display tab) that the text of the active paperspace tab also changes colour. In the above image we have changed the cross hair colour to red and as you can see the text of the layout tab has also changed colour. 
Autocad drawing won't open


Do you ever find a drawing wont open for no apparent reason! ? You would assume that a colleague may have it open on his / her machine. So you ask them to close this file and you still cant access the drawing! There is a solution! AutoCAD produces a DWL file which stands for Drawing lock. This prevents multiple user making changes to a particular file. Anyway back to sorting this annoying problem out. you need to locate the DWL file which will reside in the same folder as the drawing file then delete it

AutoCAD Tip

If you are a user of annotation scaling then this could relieve you of the annoying ghost annotation appearing when you have several scales in a drawing. To turn this off just type: SELECTIONANNODISPLAY  = 0

Wednesday, November 14, 2012

AutoCAD 2013 tips - Ellipse


 Simply draw a rectangle of any size, enter PEDIT, Select the rectangle and select spline. Hit return and you will notice you now have an ellipse. You will notice the push and pull handles are at the corners. 

Tuesday, November 6, 2012

Quick Shutdown for Windows 8


Quick Shutdown for Windows 8
My variation is to create a Metro tile which shuts down the machine, the benefit is you can tab to your tile, then press enter.
Start on the Windows 8 desktop, or in a new folder - anywhere except in the Start Menu folder!
Right-click, New, Shortcut.  Paste the instruction:
C:\windows\system32\shutdown /s /t 20 (remember the space between t and 20)
Name the shortcut after yourself, e.g. Guy's Shutdown, that way you will recognise it easily!
Use Windows Explorer to navigate to the crucial folder:
C:\ProgramData\Microsoft\Windows\Start Menu\Programs
Paste your shortcut.  (In passing you can see it's not possible to create a new shortcut here)
It's reassuring to see your shortcut amongst the other Apps.
Return to the Metro UI start screen - Windows Key is the quickest way.
Tab to your shutdown tile, press enter.

How To Delete Windows.old in Windows 8


How To Delete Windows.old in Windows 8


Windows 8 trial versions are out and include Developer Preview and Consumer Preview both with letting a user upgrade to Windows 8 from previous versions.
All the files and programs are retained while upgrading from Windows 7 to Windows 8 but all your applications are put in another folder when upgrading from Consumer or Developer Preview to the latest version.
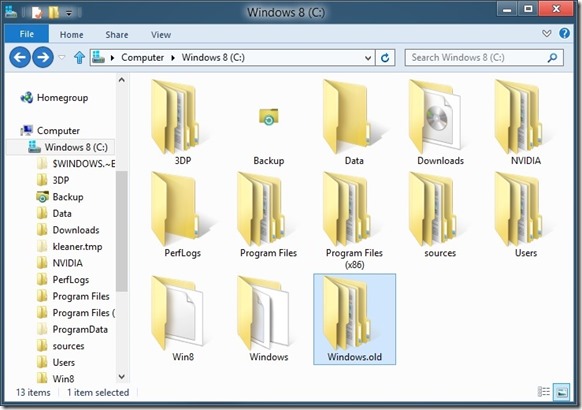
Windows.old folder - Windows 8
In case of an upgrade from either of the two Previews, you will find Windows.old folder if you chose not to format the partition when upgrading. This folder will be located in the root of installation drive for Windows. You don’t need this folder because all the files and folders belong to previous operating system. You can delete the folder and free disk space consequently.
Since Windows.old contains files from your previous system, it is recommended that you open this folder up to backup any data that you might not want to lose.
To entirely remove the Windows.old folder in Windows 8, follow the procedure:
Space
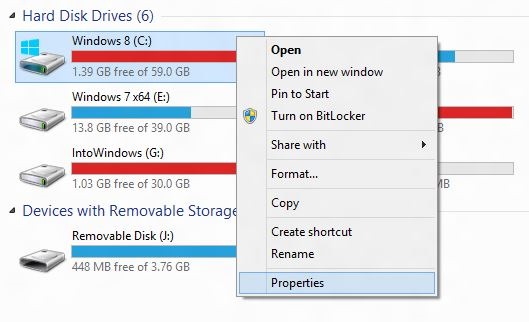
Step 1: Access the Windows drive by right-clicking on it and go to Properties.
Step 1
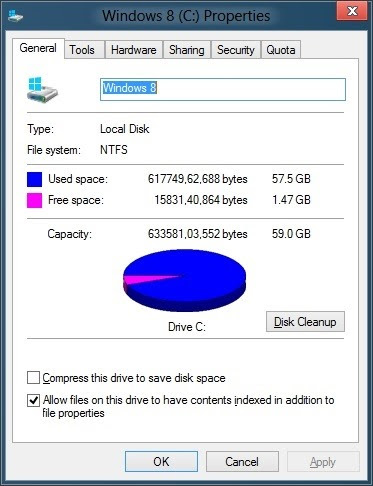
Step 2: Click on the General tab and look for Disk Cleanup option. Click on it.
Step 2

Step 3: In the next box that appears, click Clean up system files option and option and Yes UAC prompt that follows.
Step 3

Step 4: The files to be deleted will be listed. Check Previous Windows installation(s) box from the list and click Ok. Hit Apply to remove the folder completely.

Friday, November 2, 2012

unhide hidden files


How to unhide hidden files on an external drive.

1. click start>>run>>type in "cmd"
2. type the location of your flash drive.. e.g. "d:", "e:", "f:", etc..
3. type "dir /ah"
*you will now see the files/folders with hidden attributes
4. type "attrib [name of file/folder] -r -a -s -h"
*if you're going to unhide files, you should type the whole name plus the extension (format).. example "attrib party.jpg -r -a -s -h"
**if you have folders with 6 characters and above, type the first 6 characters then "~1".. example for folder named "birthday"
"attrib birthd~1 -r -a -s -h"
5. you should repeatedly type dir /ah after unhiding some files/folders so you'll know if they're now working or not..
6. now check you flash drive.. it should be there..

Sunday, August 26, 2012

Control PDF Layers

Control PDF Layers

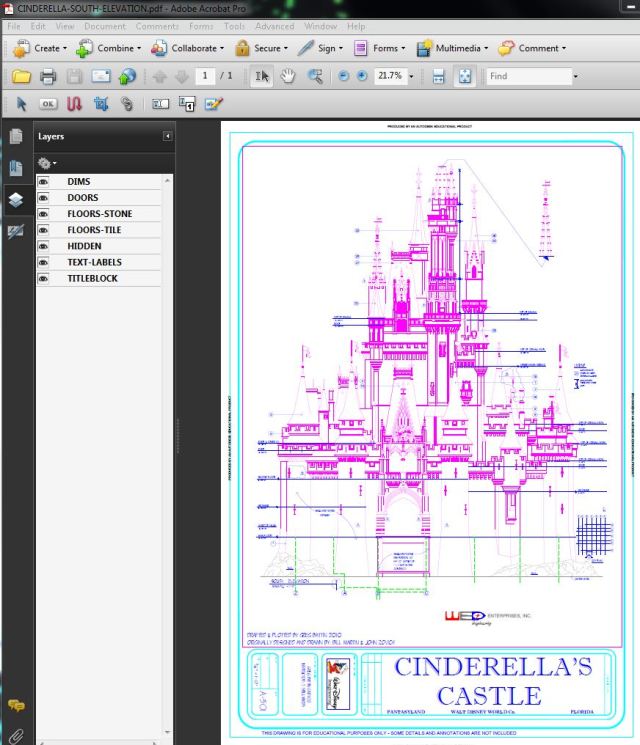
The ability to have control over layers while in a PDF is a cool/useful feature but there are times when you might not want to include them. Here’s how to turn OFF (or on) layers when creating PDFs.
(Below is an example of a PDF with Layers)
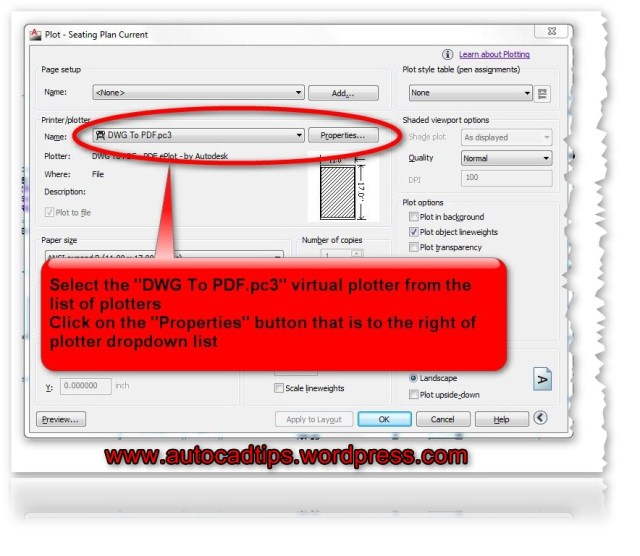
When the Plot dialog box is open: Select the “DWG To PDF.pc3″ plotter and then click the “Properties” button that is next to where you selected the plotter.
  • Click the “Device and Settings” tab
  • Select “Custom Properties”
  • Click the “Customize Properties” button at the bottom
  • Uncheck the box next to “Incude layer Information”
  • Click OK
From the Export option:
  • Open the Application menu (Big red A)
  • Click “Export”
  • Select “PDF”
  • In the “Save as PDF” dialog: CLick the “Options” button
  • Switch the option that is next to “Layer Information” to “Include” or “Do not Include”
From the Output Tab: (quickest way)
  • Click the “Output” tab of the ribbon
  • Click on the “Export to DWF/PDF Options” button that is located in the “Export to DWF/PDF” panel
  • Switch the option that is next to “Layer Information” to “Include” or “Do not Include”

Tuesday, August 21, 2012

Start Windows Update with a clean restart of Windows

Start Windows Update with a clean restart of Windows

  1. Click the Start button Picture of the Start button, type msconfig in the search box, and then clickmsconfig.exe. Administrator permission required If you're prompted for an administrator password or confirmation, type the password or provide confirmation.
  2. On the General tab, click Selective startup, and then clear the Load startup items check box.
  3. Click Services, click Hide all Microsoft services, and then click Disable all.
  4. Click OK, and then click Restart.
  5. Open Windows Update by clicking the Start button Picture of the Start button. In the search box, typeUpdate, and then, in the list of results, click Windows Update.
  6. In the left pane, click Check for updates, and then wait while Windows looks for the latest updates for your computer.
  7. If any updates are found, click Install updates. Administrator permission required If you're prompted for an administrator password or confirmation, type the password or provide confirmation.
  8. Once updates are installed, restart your computer. Click the Start button, typemsconfig in the search box, and then click msconfig.exe. Administrator permission required If you're prompted for an administrator password or confirmation, type the password or provide confirmation.
  9. On the General tab, click Normal startup, click OK, and then click Restart.

Tuesday, July 17, 2012

AutoCAD Tips & Tricks: ANNOTATIVE TEXT

By setting  SELECTIONANNODISPLAY to 0, the multiple ghost images of the same text in the various multiple scales disappear leaving only the current scale visible.

Thursday, April 19, 2012

AutoCAD 2013 tip:


Wipeout frame

Wipeout frame has another setting. Now not only you can turn it on/off, you can also choose to show it on screen but they will not plot. You can change it from WIPEOUT command then choose F for frame, then select D for display but not plot.
wipeoutframe
You can also change it directly from WIPEOUTFRAME system variable. The result of available value is below.
ValueResult
0Frames are not displayed or plotted. Frames are temporarily displayed for object selection and selection preview.
1Frames are displayed and plotted
2Frames are displayed, but not plotted

Monday, April 2, 2012

AutoCAD 2013: whats new so far.....


AutoCAD 2013 System Requirements

Note that Windows Vista is not supported by Autodesk for AutoCAD 2013.

64-bit version
Operating System:
  • Service Pack 2 (SP2) or later of the following:
    • Microsoft Windows XP Professional
  • The following operating systems:
    • Microsoft Windows 7 Enterprise
    • Microsoft Windows 7 Ultimate
    • Microsoft Windows 7 Professional
    • Microsoft Windows 7 Home Premium
Hardware:
  • CPU
    • AMD Athlon 64 with SSE2 technology
    • AMD Opteron with SSE2 technology
    • Intel Xeon with Intel EM64T support and SSE2
    • Intel Pentium 4 with Intel EM64T support and SSE2 technology
  • Memory: 2 GB (4 GB recommended)
  • Disk: Installation requires 6 GB space
  • Display: 1,024 x 768 with true color (1,600 x 1,050 with true color recommended)
For both 32 & 64-bit Misc.
  • Browser: Internet Explorer 7.0 or later web browser
  • File Formats: (New file format in AutoCAD 2013):
    • Save-as Support AutoCAD R14, AutoCAD 2000, AutoCAD 2004, AutoCAD 2007, AutoCAD 2010, AutoCAD 2013.
    • DXF Support AutoCAD R12, AutoCAD 2000, AutoCAD 2004, AutoCAD 2007, AutoCAD 2010, AutoCAD 2013
  • API
    • LISP are compatible
    • Scripts are compatible
    • ObjectARX application will need to be recompiled
For both 32 & 64-bit using 3D modeling workflows:
  • Memory 4 GB RAM or more
  • 6 GB free hard disk available not including installation requirements
  • 1,280 x 1,024 True color video display adapter 128 MB or greater, Pixel Shader 3.0 or greater support by your graphics card, Direct3D capable workstation class graphics card.


Based on Google translation from Autodesk's Japanese site these are news in AutoCAD 2013:
  • Command-line options that you can click
  • Preview of property editing
  • Viewport preview of the changes
  • Extract the surface dividing line
  • Boundary stretching tool according to the situation
  • View and cross-sectional view detailed diagram
  • Strikethrough
  • Latest user templates
  • Read Inventor file
  • Autodesk Cloud connection
  • Social media connection
  • Customize synchronization and support files
  • Application of AutoCAD Autodesk Exchange

Command Line Enhancements

The command line has been enhanced. Color and transparency can be changed. It works better as undocked and can be made smaller. It features a semi-transparent prompt history that can display up to 50 lines.

Wipeout Frame

Control displaying but not plotting the wipeout frame with the new WIPEOUTFRAME system variable.

Friday, March 30, 2012

Thursday, March 29, 2012

AutoCAD 13

Finally got my hands on the latest AutoCAD v2013.
Thanks to my sponsor (who chooses to be anonymous).
So onward..to explore new commands.
Will keep you posted

Thursday, March 22, 2012

Photoshop cs6 beta

PS6 beta now available for download. Will try out and post comments.

Thursday, March 1, 2012

Residence in Clearview Ontario


Designed for a local artist to enjoy, this residence is located just south of Collingwood, in the heart of the Clearview area. A broad selection of sustainable technologies, including a geothermal lake loop and green house set this project apart from others in the area. The building itself draws inspiration from a number of intimate relationships and views, both through the adjacent woodland, as well as across the nearby pond
-Altius Architects

Wednesday, February 29, 2012

Lesser Known AutoCAD Gems: Creating Metric Drawing Sheets with Imperial Page Sizes

Creating Metric Drawing Sheets with Imperial Page Sizes


Although imperial measurements remain the prevalent standard in the U.S., a growing number of projects are indeed utilizing metric measurements. This combination of both imperial and metric measurements creates a unique challenge for many architects and engineers. After all we’re taught paper space (layouts) should always be 1:1, yet using a standard imperial paper size like Arch D (24 in x 36 in) will yield a layout of about 0.94 x 1.41 units – not the intended result.
So the question remains, how do you plot a metric drawing using a standard imperial paper size such as Arch D (24 in x 36 in)?
  1. Open the Page Setup Manager; right-click on layout tab, Application Menu > Print > Page Setup.
  2. Create a new named page setup by clicking New.
  3. Give your page setup a name and click OK. In this example I’ll use Arch D Metric
    NewPageSetup
  4. Configure the Page Setup dialog just as you would for a “normal” imperial plot.
    Select plotter, paper size, etc.
    SelectPlotterPaper
  5. Within the Plot Scale portion of the Page Setup dialog, click the drop-down list that currently reads inches, and click mm.
    ChooseUnits
  6. Verify the Plot Scale is 1:1, and the preview updates to display the dimensions of the selected paper size in millimeters not inches (914 mm x 610 mm in the example of an Arch D 36 in x 24 in drawing sheet). Click OK to save the page setup.
    FinalPageSetup
The most important part to the above process is changing from inches to mm within the Plot Scale portion of the dialog. Doing this will make it so you can plot to a 24 in x 36 in piece of paper, but more importantly – select actual Metric scales for your viewports.

Wednesday, February 22, 2012

Words to ponder on!


There is no time for cut-and-dried monotony.
There is time for work.
And time for love.
That leaves no other time! - Coco Chanel


Tuesday, February 21, 2012

Monday, February 20, 2012

What Google knows about you

From your searches and most visited sites 
Google creates a composite of you.


Find out what Google thinks of you HERE.


As an experiment. Rate its correctness on a scale of 1-10 and put your score in the comment box.

Lesser known Autocad 2012 gems: Drag and move with keyboard

Select an object...
Note: Avoid keeping the cursor on any grip
Now hold down the control key and using the cursor keys on the keyboard move the object around.