Simply draw a rectangle of any size, enter PEDIT, Select the rectangle and select spline. Hit return and you will notice you now have an ellipse. You will notice the push and pull handles are at the corners.
Wednesday, November 14, 2012

Tuesday, November 6, 2012
Quick Shutdown for Windows 8
Quick Shutdown for Windows 8
My variation is to create a Metro tile which shuts down the machine, the benefit is you can tab to your tile, then press enter.
Start on the Windows 8 desktop, or in a new folder - anywhere except in the Start Menu folder!
Right-click, New, Shortcut. Paste the instruction:
C:\windows\system32\shutdown /s /t 20 (remember the space between t and 20)
Name the shortcut after yourself, e.g. Guy's Shutdown, that way you will recognise it easily!
Use Windows Explorer to navigate to the crucial folder:
C:\ProgramData\Microsoft\Windows\Start Menu\Programs
Paste your shortcut. (In passing you can see it's not possible to create a new shortcut here)
It's reassuring to see your shortcut amongst the other Apps.
Return to the Metro UI start screen - Windows Key is the quickest way.
Tab to your shutdown tile, press enter.
How To Delete Windows.old in Windows 8
How To Delete Windows.old in Windows 8
Windows 8 trial versions are out and include Developer Preview and Consumer Preview both with letting a user upgrade to Windows 8 from previous versions.
All the files and programs are retained while upgrading from Windows 7 to Windows 8 but all your applications are put in another folder when upgrading from Consumer or Developer Preview to the latest version.
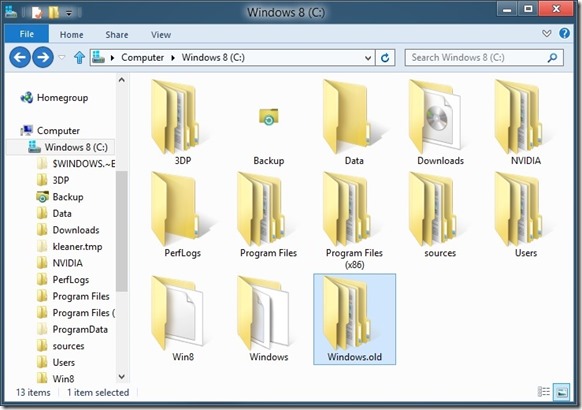
In case of an upgrade from either of the two Previews, you will find Windows.old folder if you chose not to format the partition when upgrading. This folder will be located in the root of installation drive for Windows. You don’t need this folder because all the files and folders belong to previous operating system. You can delete the folder and free disk space consequently.
Since Windows.old contains files from your previous system, it is recommended that you open this folder up to backup any data that you might not want to lose.
To entirely remove the Windows.old folder in Windows 8, follow the procedure:
Space
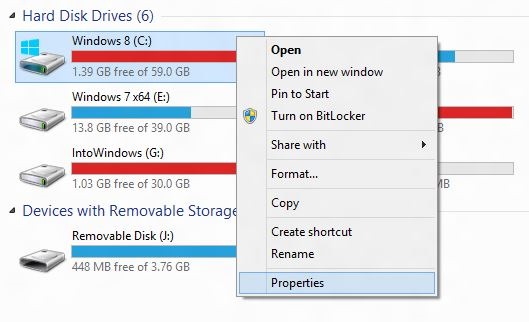
Step 1: Access the Windows drive by right-clicking on it and go to Properties.
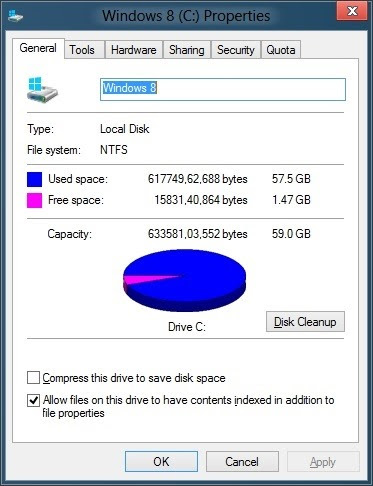
Step 2: Click on the General tab and look for Disk Cleanup option. Click on it.
Step 3: In the next box that appears, click Clean up system files option and option and Yes UAC prompt that follows.
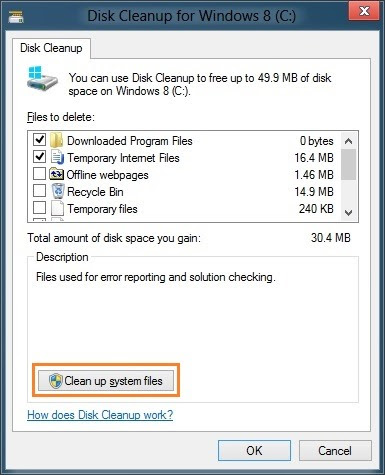
Step 4: The files to be deleted will be listed. Check Previous Windows installation(s) box from the list and click Ok. Hit Apply to remove the folder completely.
Friday, November 2, 2012
unhide hidden files
How to unhide hidden files on an external drive.
1. click start>>run>>type in "cmd"
2. type the location of your flash drive.. e.g. "d:", "e:", "f:", etc..
3. type "dir /ah"
*you will now see the files/folders with hidden attributes
4. type "attrib [name of file/folder] -r -a -s -h"
*if you're going to unhide files, you should type the whole name plus the extension (format).. example "attrib party.jpg -r -a -s -h"
**if you have folders with 6 characters and above, type the first 6 characters then "~1".. example for folder named "birthday"
"attrib birthd~1 -r -a -s -h"
5. you should repeatedly type dir /ah after unhiding some files/folders so you'll know if they're now working or not..
6. now check you flash drive.. it should be there..
Sunday, August 26, 2012
Control PDF Layers
Control PDF Layers
The ability to have control over layers while in a PDF is a cool/useful feature but there are times when you might not want to include them. Here’s how to turn OFF (or on) layers when creating PDFs.
(Below is an example of a PDF with Layers)

When the Plot dialog box is open: Select the “DWG To PDF.pc3″ plotter and then click the “Properties” button that is next to where you selected the plotter.

- Click the “Device and Settings” tab
- Select “Custom Properties”
- Click the “Customize Properties” button at the bottom

- Uncheck the box next to “Incude layer Information”
- Click OK

From the Export option:
- Open the Application menu (Big red A)
- Click “Export”
- Select “PDF”
- In the “Save as PDF” dialog: CLick the “Options” button
- Switch the option that is next to “Layer Information” to “Include” or “Do not Include”
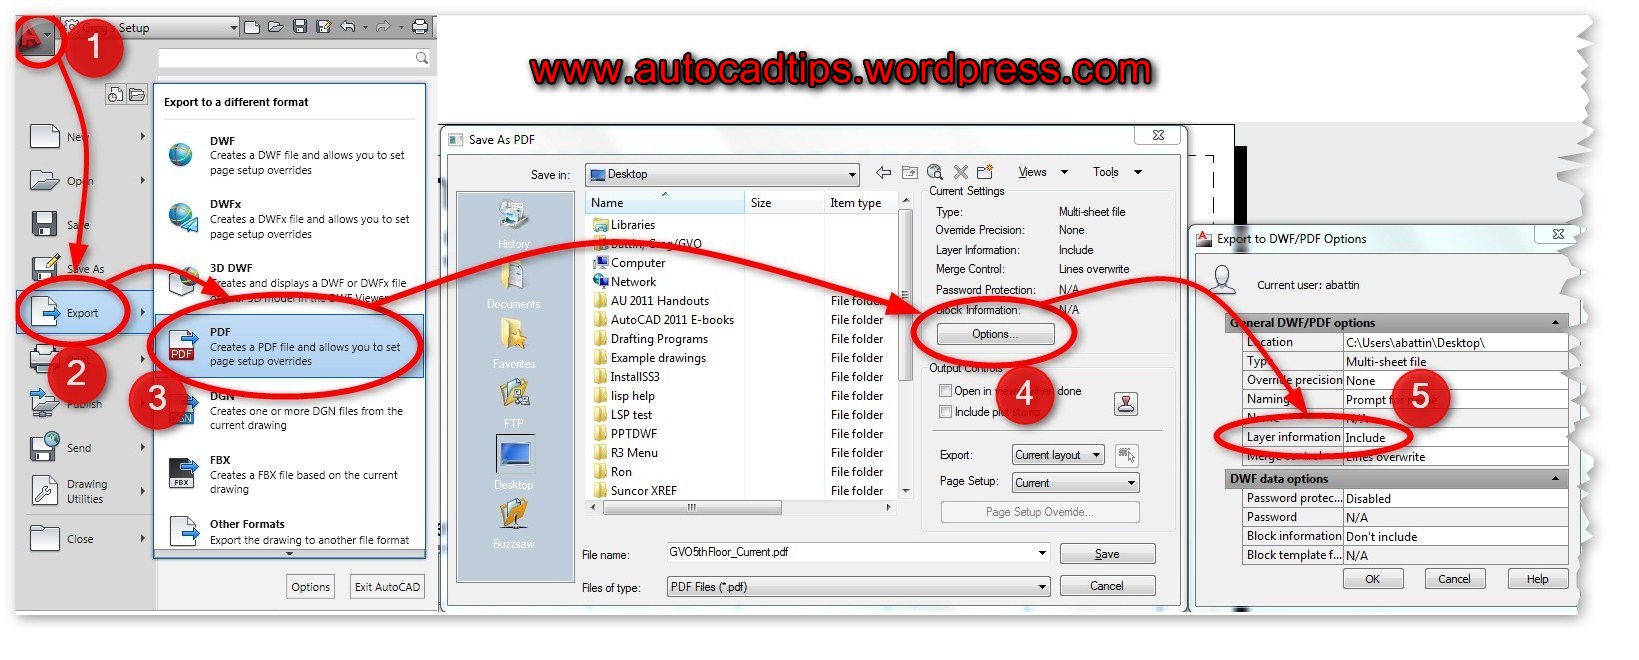
From the Output Tab: (quickest way)
- Click the “Output” tab of the ribbon
- Click on the “Export to DWF/PDF Options” button that is located in the “Export to DWF/PDF” panel
- Switch the option that is next to “Layer Information” to “Include” or “Do not Include”

Tuesday, August 21, 2012
Start Windows Update with a clean restart of Windows
Start Windows Update with a clean restart of Windows
- Click the Start button
, type msconfig in the search box, and then clickmsconfig.exe.
If you're prompted for an administrator password or confirmation, type the password or provide confirmation.
- On the General tab, click Selective startup, and then clear the Load startup items check box.
- Click Services, click Hide all Microsoft services, and then click Disable all.
- Click OK, and then click Restart.
- Open Windows Update by clicking the Start button
- In the left pane, click Check for updates, and then wait while Windows looks for the latest updates for your computer.
- If any updates are found, click Install updates.
- Once updates are installed, restart your computer. Click the Start button, typemsconfig in the search box, and then click msconfig.exe.
- On the General tab, click Normal startup, click OK, and then click Restart.
Tuesday, July 17, 2012
AutoCAD Tips & Tricks: ANNOTATIVE TEXT
By setting SELECTIONANNODISPLAY to 0, the multiple ghost images of the same text in the various multiple scales disappear leaving only the current scale visible.
Subscribe to:
Posts (Atom)